


- Site Navigation -
NEWS LIST
What is the construction process of Wall-Penetrating Bolt?
Author:yicheng Date:2025-09-03 15:57:32 Hits:78
What is the construction process of Wall-Penetrating Bolt?
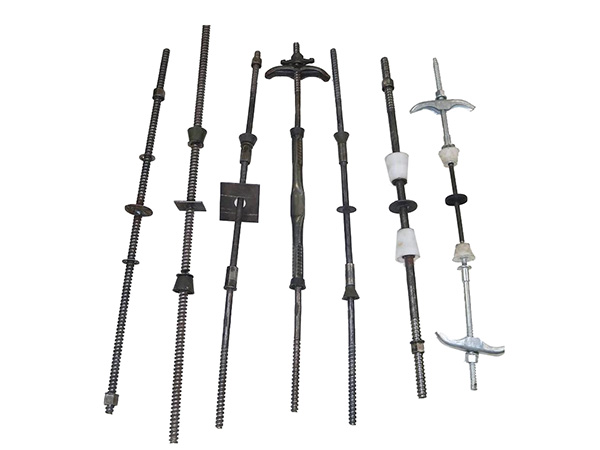
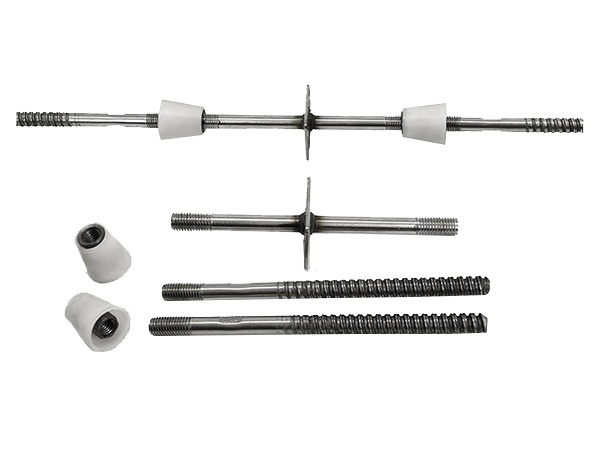
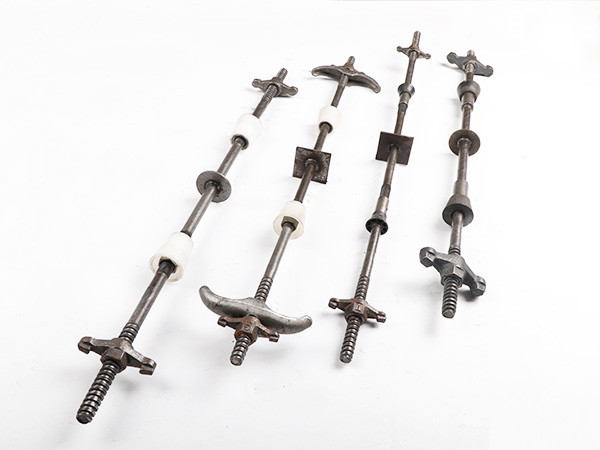
The core goal is to ensure accurate screw positioning,firm formwork fixation,and lay the foundation for subsequent waterproofing and structural forming quality.The following is a complete construction process disassembly:1.Pre-construction preparation stage Material and tool verification Confirm the specifications of the Wall-Penetrating Bolt(such as diameter 12mm/14mm,length matching wall thickness+formwork thickness+support spacing),type(through screw,three-stage screw,etc.),and check that the appearance of the screw is not bent and the thread is not damaged;if it is a waterproof scene(such as a basement exterior wall),it is necessary to check whether the screw comes with a waterstop(ring),and the waterstop welding should be full and without leakage.Prepare supporting accessories:nuts(match the screw thread),washer(enhance the stress area and avoid damage to the formwork),PVC casing(for detachable screws,convenient for later extraction of the screw);at the same time,prepare tools such as tape measures,levels,wrenches,hammers,etc.Construction plan disclosure Combined with the construction drawings,clarify the screw layout spacing(usually 400-600mm horizontal/vertical spacing,wall corners,door and window openings need to be encrypted),positioning coordinates,and focus on the water-stop requirements of the screw in the waterproof area;Disclose safety specifications(such as high-altitude work protection,screw installation stress standards)and quality control points(such as screw verticality and formwork flatness requirements)to the construction personnel.2.Formwork pretreatment and screw positioning Formwork drilling According to the screw layout drawing,mark the drilling position on the cut and assembled steel formwork(or wooden formwork)to ensure that the drilling position of the inner and outer formwork is perfectly aligned(deviation≤2mm).Use an electric drill to drill holes,the hole diameter is 1-2mm larger than the screw diameter(such as 14mm screw drilling 15-16mm holes)to avoid the hole diameter being too small and making it difficult for the screw to penetrate,or too large causing slurry leakage;After drilling,clean the burrs around the template hole to prevent damage to the screw thread.PVC casing embedded(removable screw scene)If a three-stage removable screw is used,PVC casing should be inserted at the hole on the inside of the formwork(length=wall design thickness,pipe diameter is 2-3mm larger than the screw)to ensure that both ends of the casing are tightly fitted with the inside of the formwork and there is no skew;Sealing tape can be pasted at both ends of the casing to reduce the risk of slurry leakage during concrete pouring.3.Installation of wall screw and formwork fixation Screw threading and preliminary fixation A special person will thread the wall through the screw from the outside of the formwork into the inside,and keep the screw perpendicular to the formwork surface(calibrated with a level)to avoid uneven force on the formwork caused by the screw tilt.If it is a waterproof screw,it is necessary to ensure that the waterstop(ring)is located at the centerline of the wall,and that the waterstop is perpendicular to the screw and has no offset;After threading,put the washer and screw in turn at both ends of the screw,and initially tighten it until the nut and washer fit the formwork,and do not apply excessive force for the time being.Formwork support and screw stress adjustment Install the outer support system of the formwork(such as steel pipe scaffolding,square wood keel)to make the support and screw form a stressed whole;Check the verticality(deviation≤3mm/m)and flatness(deviation≤2mm/m)of the formwork through a level and line drop.4.Concrete pouring and process monitoring Check the fastening status of the screw screw before pouring concrete:use a wrench to check whether the nut is loose,observe whether there is a gap between the screw and the formwork,and if the problem is found,repair it in time or seal it with sealant.4.Concrete pouring and process monitoring Check before pouring Before pouring concrete,check the fastening status of the screw through the wall again:use a wrench to check whether the nut is loose,observe whether there is a gap between the screw and the formwork,and if any problems are found,repair it in time or seal it with sealant.For the screw in the waterproof area,focus on checking whether the perimeter of the waterstop is clean(no debris accumulation)to avoid debris affecting the combination of concrete and waterstop,leading to leakage in the later stage.Monitoring of the pouring process When pouring concrete,the layered pouring method is adopted(each layer is≤500mm thick),and the vibrating rod avoids direct impact on the screw and formwork through the wall to prevent the screw from shifting or formwork deformation.Arrange a special person to inspect the whole process:observe whether the screw is bent and whether the nut is loose,if the formwork is found to be bulging,stop pouring immediately,and solve it by reinforcing the screw or adding support,and continue pouring after the hidden danger is eliminated.5.Later mold removal and screw treatment Control the timing of mold removal After the concrete strength meets the design requirements(usually the wall concrete strength≥75%of the design strength,which can be determined by the test block test under the same conditions),the formwork and the related support of the wall screw can be removed.The order of mold removal follows the"non-load-bearing first,then load-bearing,outer side first,then inside":first remove the formwork support system,then loosen the nuts at both ends of the screw,and finally remove the formwork.Screw recovery and hole treatment Detachable screw(such as three-stage type):first unscrew the connecting nuts at both ends,pull out the outer screw section,and then pull out the middle screw segment from the inside(if there is a PVC casing,pull out the casing simultaneously),and the recovered screw can be reused after cleaning and rust removal.Non-removable screw(such as thread screw):After the formwork is removed,use a grinding wheel cutter to cut off the part of the screw exposed to the wall(the cutting surface should be 2-3mm lower than the wall)to avoid the exposed screw affecting the subsequent decoration or causing rust.Hole sealing(waterproof scene):The holes left after the screw is removed need to be sealed according to the waterproof requirements:first clean up the debris and floating ash in the hole,and apply the interface agent;then use micro-expanded waterproof mortar to fill it twice(the first time to fill 1/2 of the hole,and the second time to be flush with the wall after initial setting);Finally,apply waterproof paint around the holes on both sides of the wall to form a waterproof reinforcement layer to prevent rainwater or groundwater leakage.6.Quality acceptance Visual inspection:The wall surface is free of honeycomb and hemp surface caused by loose screws,the screw cutting area is flat,and the holes are sealed tightly and without cracks.Dimensional inspection:Use a tape measure to check the thickness of the wall,and the deviation must meet the requirements of the specification(usually±5mm)to ensure that the screw installation does not cause the formwork to shift.Waterproof testing:For waterproof areas(such as basement exterior walls),after the hole sealing is completed,conduct a water closure test(lasting 24 hours),and observe that there are no leakage traces on the inside and side of the wall,which is acceptable.

Contact Us
Tel:+86-15831733891
E-mail:yichengbuildingmaterials@gmail.com
Add:100 meters south of Weicun Village, Hechengjie Town, Xian County, Cangzhou City, Hebei Province
Url:https://www.yc-buildingmaterials.com